

Here is the way to make a picture bracelet – from objects you wouldn’t usually take into consideration for crafting!
This picture bracelet comes from one in every of my early craft books that I wrote for tweens, again in 2005! What I really like about it’s it’s so straightforward to make from objects you in all probability have already got. And if not, I have links where you can buy them.
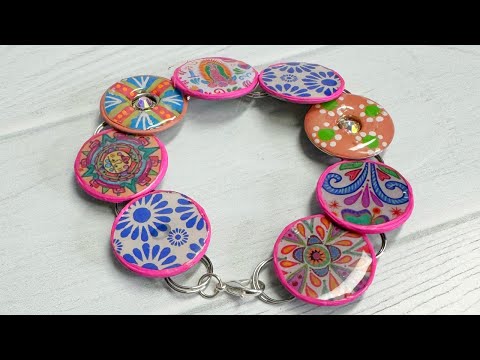
I used scrap paper, however you can too use cloth, wrapping paper, ephemera, or anything that you just assume would make a bracelet to indicate off.
If you intend to make use of household photographs, make certain to make coloration copies, by no means use the originals!
Resin makes all of it come collectively and look very polished. However, in case you are making this with youngsters, be at liberty to make use of one thing like Mod Podge. Either manner the bracelet will come out 100% distinctive to you!
Video of how to make a picture bracelet
Supplies to make a picture bracelet
– Bola tie slides (to hold the washers together)
– Printed footage or pictures (ideally coated)
– UV resin and UV lamp for curing
– White craft glue
– Extra power craft glue, like E6000
– Scissors
– Disposable gloves (for dealing with resin)
– Sandpaper (non-compulsory, to easy washer edges)
– Jewelry clasp and leap rings (for the bracelet closure)
Directions to make a picture bracelet
Make positive the washers are clear and free from oil or dust.

Choose your footage. If you utilize shiny picture paper, you received’t have to seal. But in case your paper is uncoated, you’ll want so as to add a sealer. Stay tuned for that step…

Apply a skinny layer of white craft glue to the highest of the washer.

Carefully place the picture on the washer. Smooth out any bubbles or wrinkles.
Prepare your workspace for resin utility. Work in a well-ventilated space and put on disposable gloves.
Prep the UV resin in accordance with the producer’s directions.

Apply a skinny layer of resin over the picture and washer. Ensure the resin covers the picture fully and goes barely over the sting of the washer to type a small dome.
Use a toothpick or a small software to pop any bubbles that type within the resin.
Cure the resin below a UV lamp or in direct daylight as per the resin directions (often about 2-15 minutes, relying on the resin model and UV power).
Assemble the Bracelet
Once the resin is cured and exhausting, you’ll be able to assemble the bracelet!
Turn the bracelet items again facet up. Add E6000 to the washer, then the bola tie slide. Let dry for a couple hours.

Link the washers collectively utilizing the leap rings. Press the perimeters of the bola tie slide down so the leap ring can not slip off.
Add a jewellery clasp and leap rings on the ends of the bracelet for straightforward sporting.

Check all connections to make sure they’re safe.
Adjust the match by including or eradicating washers as wanted.

Here is my completed bracelet!

RELATED:
How to make uv resin keychains – w/ GLITTER!
How to make resin tile coasters
Easy resin craft: How to sparkle espresso cups


